"Introduction to Raspberry-Pi and Arduino and some basic sensors"
What is an Arduino?
Arduino is an open-source platform used for building electronics projects. Arduino consists of both a physical programmable circuit board (often referred to as a microcontroller) and a piece of software, or IDE (Integrated Development Environment) that runs on your computer, used to write and upload computer code to the physical board.
The Arduino platform has become quite popular with people just starting out with electronics, and for good reason. The Arduino does not need a separate piece of hardware (called a programmer) in order to load new code onto the board – you can simply use a USB cable. Additionally, the Arduino IDE uses a simplified version of C++, making it easier to learn to program. Finally, Arduino provides a standard form factor that breaks out the functions of the micro-controller into a more accessible package.
What Does it Do?
The Arduino hardware and software was designed for artists, designers, hobbyists, hackers, newbies, and anyone interested in creating interactive objects or environments. Arduino can interact with buttons, LEDs, motors, speakers, GPS units, cameras, the internet, and even your smart-phone or your TV! This flexibility combined with the fact that the Arduino software is free, the hardware boards are pretty cheap, and both the software and hardware are easy to learn has led to a large community of users who have contributed code and released instructions for a huge variety of Arduino-based projects.
For everything from robots and a heating pad hand warming blanket to honest fortune-telling machines, and even a Dungeons and Dragons dice-throwing gauntlet, the Arduino can be used as the brains behind almost any electronics project.
What's on the board?
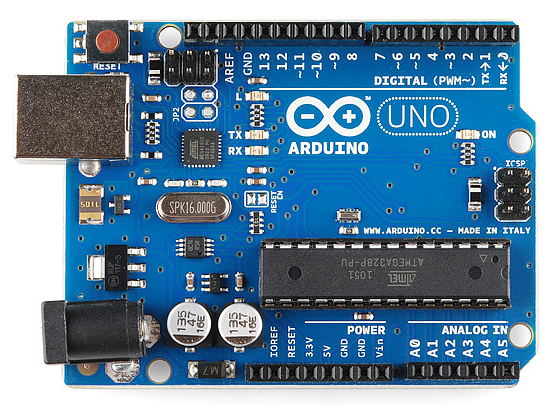
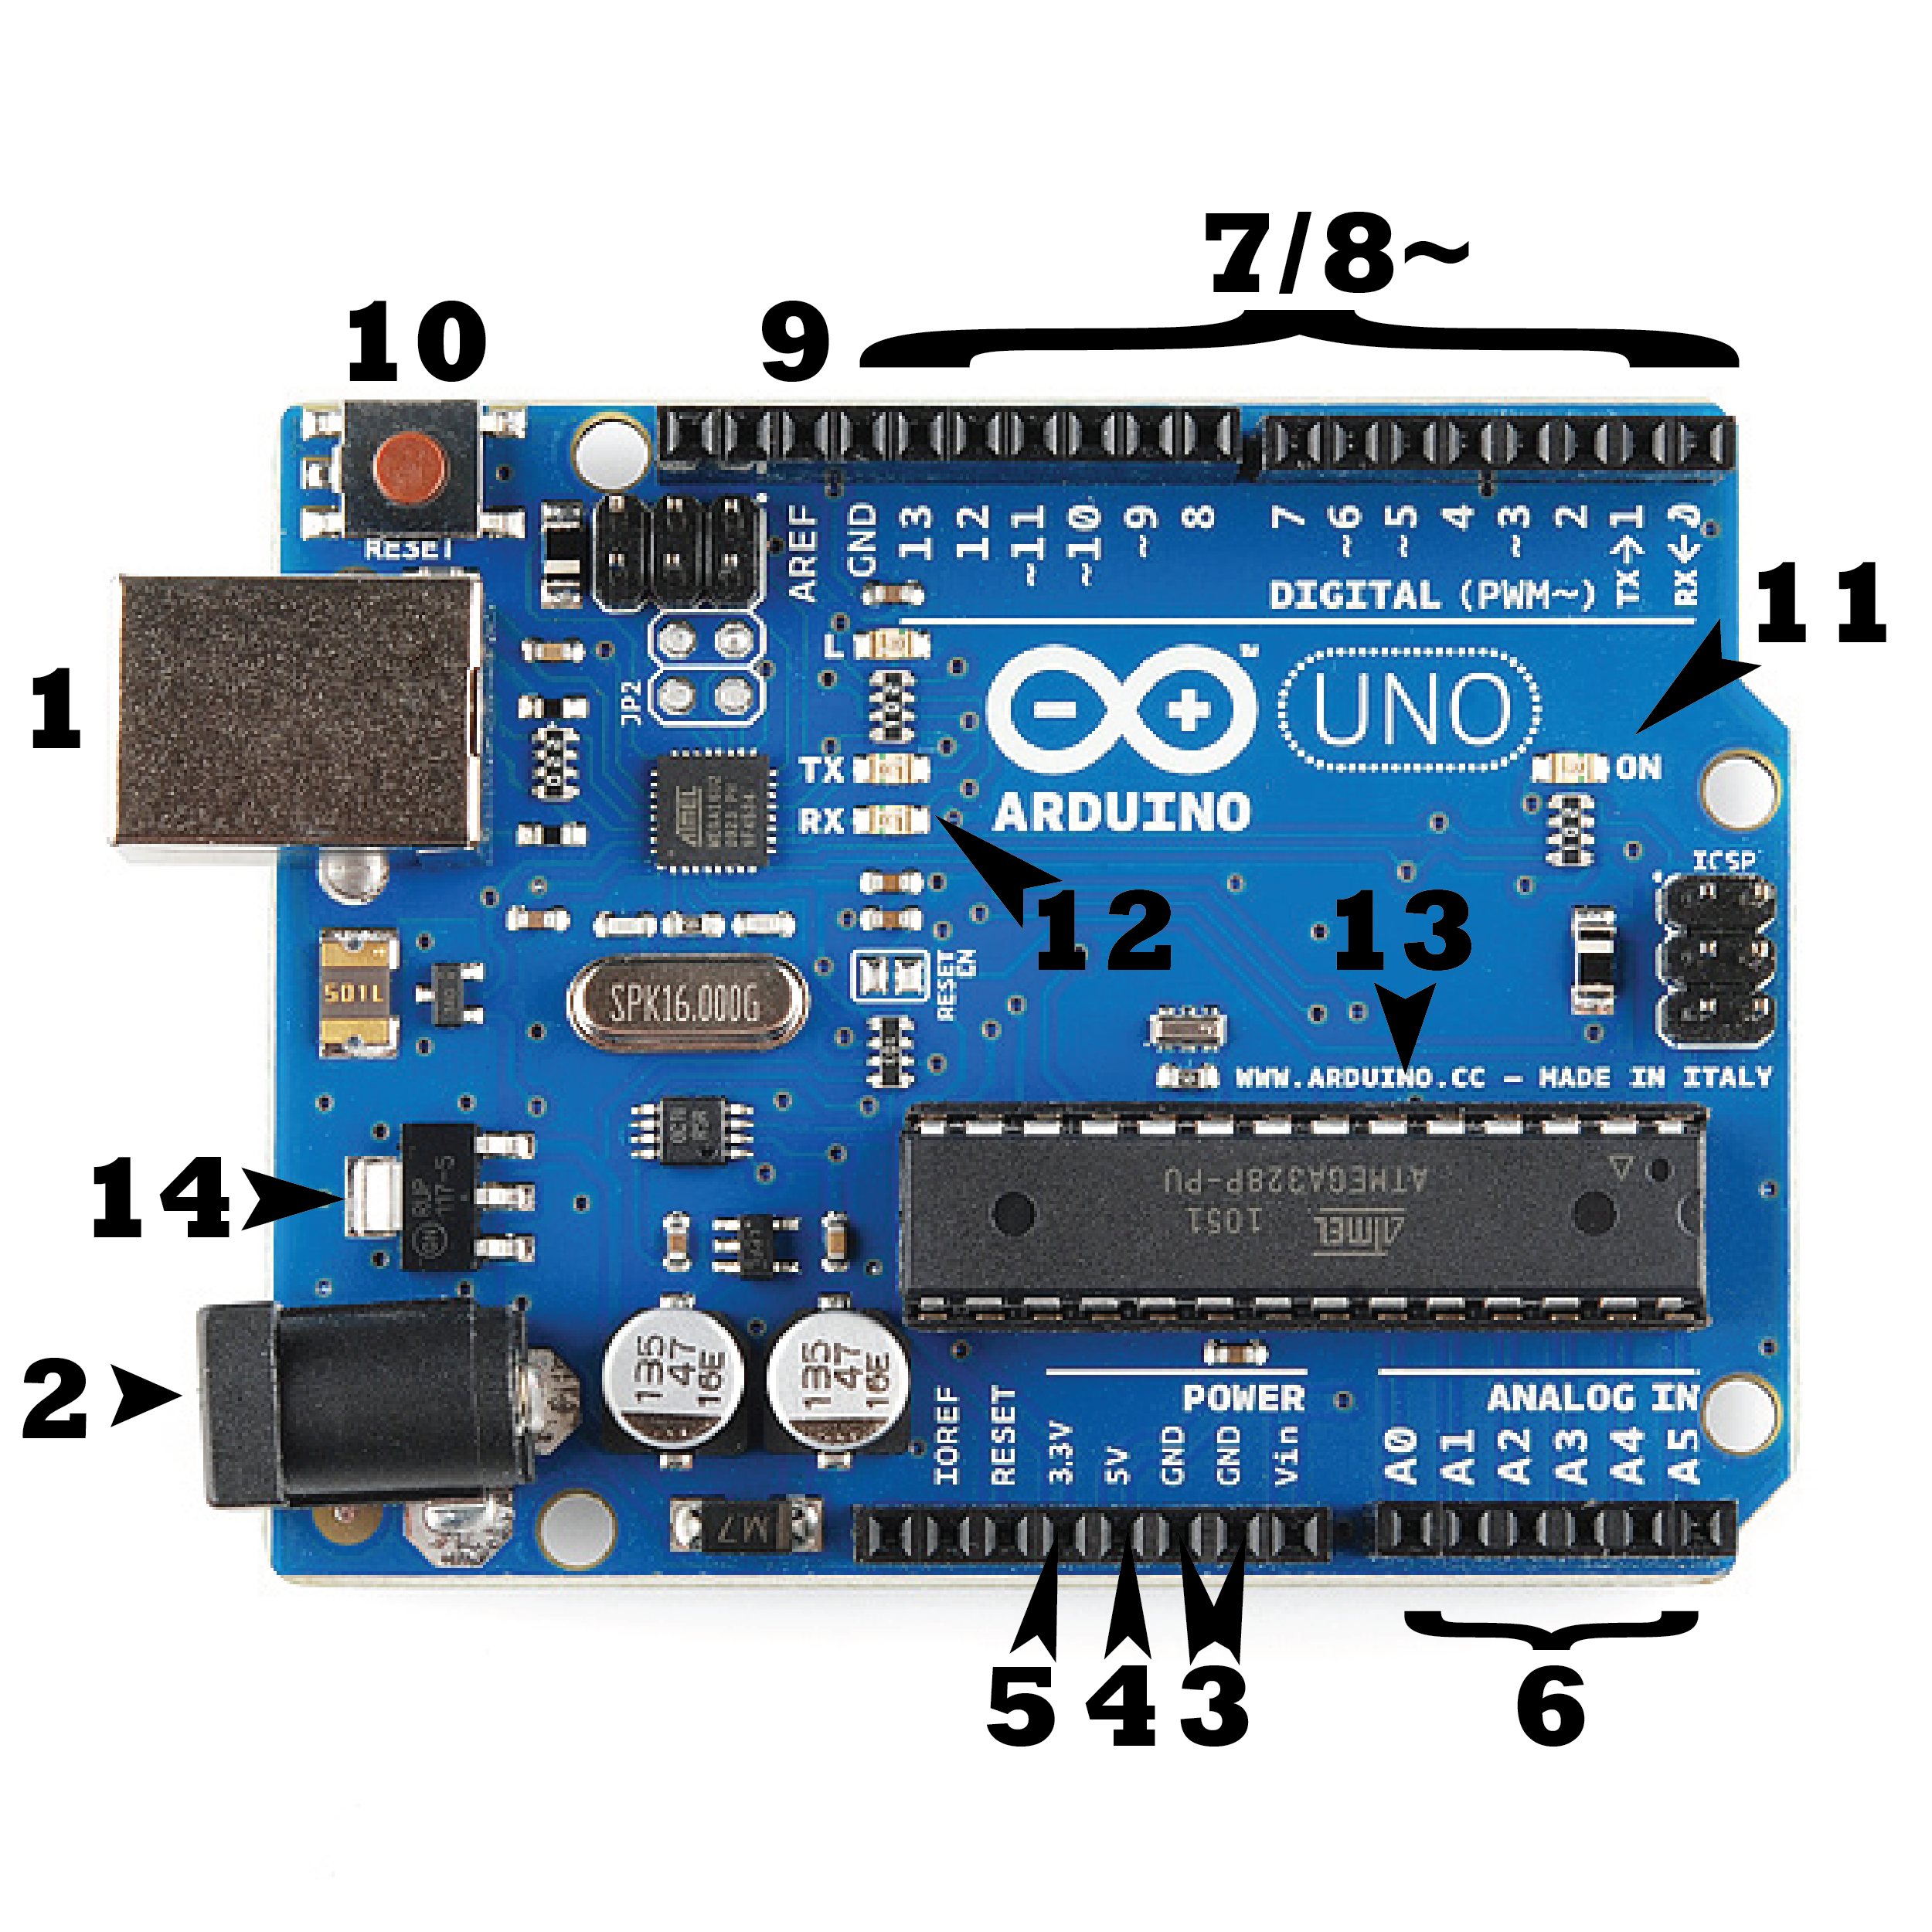
There are many varieties of Arduino boards that can be used for different purposes, mostly we use Arduino Uno. Some boards look a bit different from the one below, but most Arduinos have the majority of these components in common:
There are many varieties of Arduino boards that can be used for different purposes, mostly we use Arduino Uno. Some boards look a bit different from the one below, but most Arduinos have the majority of these components in common:
Power (USB / Barrel Jack)
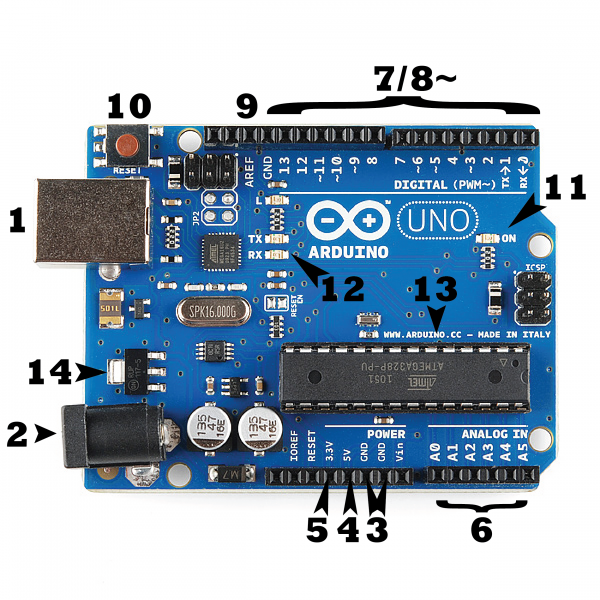
Every Arduino board needs a way to be connected to a power source. The Arduino UNO can be powered from a USB cable coming from your computer or a wall power supply that is terminated in a barrel jack. In the picture above the USB connection is labeled (1) and the barrel jack is labeled (2).
The USB connection is also how you will load code onto your Arduino board.
NOTE: Do NOT use a power supply greater than 20 Volts as you will overpower (and thereby destroy) your Arduino. The recommended voltage for most Arduino models is between 6 and 12 Volts.
Pins (5V, 3.3V, GND, Analog, Digital, PWM, AREF)
The pins on your Arduino are the places where you connect wires to construct a circuit (probably in conjunction with a breadboard and some wire. They usually have black plastic ‘headers’ that allow you to just plug a wire right into the board. The Arduino has several different kinds of pins, each of which is labeled on the board and used for different functions.
- GND (3): Short for ‘Ground’. There are several GND pins on the Arduino, any of which can be used to ground your circuit.
- 5V (4) & 3.3V (5): As you might guess, the 5V pin supplies 5 volts of power, and the 3.3V pin supplies 3.3 volts of power. Most of the simple components used with the Arduino run happily off of 5 or 3.3 volts.
- Analog (6): The area of pins under the ‘Analog In’ label (A0 through A5 on the UNO) are Analog In pins. These pins can read the signal from an analog sensor (like a temperature sensor) and convert it into a digital value that we can read.
- Digital (7): Across from the analog pins are the digital pins (0 through 13 on the UNO). These pins can be used for both digital input (like telling if a button is pushed) and digital output (like powering an LED).
- PWM (8): You may have noticed the tilde (~) next to some of the digital pins (3, 5, 6, 9, 10, and 11 on the UNO). These pins act as normal digital pins, but can also be used for something called Pulse-Width Modulation (PWM).
- AREF (9): Stands for Analog Reference. Most of the time you can leave this pin alone. It is sometimes used to set an external reference voltage (between 0 and 5 Volts) as the upper limit for the analog input pins.
Reset Button
Just like the original Nintendo, the Arduino has a reset button (10). Pushing it will temporarily connect the reset pin to ground and restart any code that is loaded on the Arduino. This can be very useful if your code doesn’t repeat, but you want to test it multiple times. Unlike the original Nintendo however, blowing on the Arduino doesn’t usually fix any problems.
Just like the original Nintendo, the Arduino has a reset button (10). Pushing it will temporarily connect the reset pin to ground and restart any code that is loaded on the Arduino. This can be very useful if your code doesn’t repeat, but you want to test it multiple times. Unlike the original Nintendo however, blowing on the Arduino doesn’t usually fix any problems.
Power LED Indicator
Just beneath and to the right of the word “UNO” on your circuit board, there’s a tiny LED next to the word ‘ON’ (11). This LED should light up whenever you plug your Arduino into a power source. If this light doesn’t turn on, there’s a good chance something is wrong. Time to re-check your circuit!
Just beneath and to the right of the word “UNO” on your circuit board, there’s a tiny LED next to the word ‘ON’ (11). This LED should light up whenever you plug your Arduino into a power source. If this light doesn’t turn on, there’s a good chance something is wrong. Time to re-check your circuit!
TX RX LEDs
TX is short for transmitting, RX is short for receive. These markings appear quite a bit in electronics to indicate the pins responsible for serial communication. In our case, there are two places on the Arduino UNO where TX and RX appear – once by digital pins 0 and 1, and a second time next to the TX and RX indicator LEDs (12). These LEDs will give us some nice visual indications whenever our Arduino is receiving or transmitting data (like when we’re loading a new program onto the board).
TX is short for transmitting, RX is short for receive. These markings appear quite a bit in electronics to indicate the pins responsible for serial communication. In our case, there are two places on the Arduino UNO where TX and RX appear – once by digital pins 0 and 1, and a second time next to the TX and RX indicator LEDs (12). These LEDs will give us some nice visual indications whenever our Arduino is receiving or transmitting data (like when we’re loading a new program onto the board).
Main IC
The black thing with all the metal legs is an IC, or Integrated Circuit (13). Think of it as the brains of our Arduino. The main IC on the Arduino is slightly different from board type to board type. This can be important, as you may need to know the IC type (along with your board type) before loading up a new program from the Arduino software. This information can usually be found in writing on the top side of the IC. If you want to know more about the difference between various IC’s, reading the datasheets is often a good idea.
The black thing with all the metal legs is an IC, or Integrated Circuit (13). Think of it as the brains of our Arduino. The main IC on the Arduino is slightly different from board type to board type. This can be important, as you may need to know the IC type (along with your board type) before loading up a new program from the Arduino software. This information can usually be found in writing on the top side of the IC. If you want to know more about the difference between various IC’s, reading the datasheets is often a good idea.
Voltage Regulator
The voltage regulator (14) is not actually something you can (or should) interact with on the Arduino. But it is potentially useful to know that it is there and what it’s for. The voltage regulator does exactly what it says – it controls the amount of voltage that is let into the Arduino board. Think of it as a kind of gatekeeper; it will turn away an extra voltage that might harm the circuit. Of course, it has its limits, so don’t hook up your Arduino to anything greater than 20 volts
The voltage regulator (14) is not actually something you can (or should) interact with on the Arduino. But it is potentially useful to know that it is there and what it’s for. The voltage regulator does exactly what it says – it controls the amount of voltage that is let into the Arduino board. Think of it as a kind of gatekeeper; it will turn away an extra voltage that might harm the circuit. Of course, it has its limits, so don’t hook up your Arduino to anything greater than 20 volts
WHAT IS RASPBERRY PI?
Raspberry Pi is a small, single-board computer that was originally developed for computer science education and has since been popularized by digital hobbyists and makers of the Internet of Things (IoT) devices.
Raspberry PI, whose basic model costs $35 is about the size of a credit card, has a 64-bit quad-core ARMv8 processor and uses a Raspbian distribution of Linux for its default operating system (OS).
The Raspberry Pi computer is essentially a wireless Internet-capable system-on-a-chip (SoC) with 1 GB RAM, connection ports, a Micro SD card slot, camera and display interfaces and an audio/video jack. The Raspberry Pi Foundation offers several versions of Raspberry Pi, including the Raspberry Pi Zero, a $5 model which was released in 2015.
A United Kingdom (UK) charitable organization called the Raspberry Pi Foundation developed the device after noticing a decline in Cambridge University's Computer Science undergraduate degree in the early 2000's. The organization's stated mission is "to put the power of digital making into the hands of people all over the world." Since the first Rasperry Pi product was launched in 2012, the foundation has sold over eight million Raspberry Pi computers.

"The physical computing stack is steadily working its way into organizations in the form of little sensor modules, out-of-the-way telemetry devices, and embedded machine control products such as Raspberry Pi computers."
Raspberry Pi is a capable little computer which can be used in electronics projects, and for many of the things that your desktop PC does, like spreadsheets, word-processing, browsing the internet and games. It also plays high-definition video. The Raspberry Pi strives to provide a simple platform for (primarily) kids to try learning programming in the same way we did in the 80s as kids... by playing around. By having as little complexity (and cost!) acting as a barrier to entry, it is hoped that a new generation of programmers that learned as kids, and speak code as fluently as they do their primary language, might emerge.
What's On the Board?

- ARM CPU/GPU -- This is a Broadcom BCM2835 System on a Chip (SoC) that's made up of an ARM central processing unit (CPU) and a Videocore 4 graphics processing unit (GPU). The CPU handles all the computations that make a computer work (taking input, doing calculations and producing output), and the GPU handles graphics output.
- GPIO -- These are exposed general-purpose input/output connection points that will allow the real hardware hobbyists the opportunity to tinker.
- RCA -- An RCA jack allows connection of analog TVs and other similar output devices.
- Audio out -- This is a standard 3.55-millimeter jack for connection of audio output devices such as headphones or speakers. There is no audio in.
- LEDs -- Light-emitting diodes, for all of your indicator light needs.
- USB -- This is a common connection port for peripheral devices of all types (including your mouse and keyboard). Model A has one, and Model B has two. You can use a USB hub to expand the number of ports or plug your mouse into your keyboard if it has its own USB port.
- HDMI -- This connector allows you to hook up a high-definition television or other compatible device using an HDMI cable.
- Power -- This is a 5v Micro USB power connector into which you can plug your compatible power supply.
- SD card slot -- This is a full-sized SD card slot. An SD card with an operating system (OS) installed is required for booting the device. They are available for purchase from the manufacturers, but you can also download an OS and save it to the card yourself if you have a Linux machine and the wherewithal.
- Ethernet -- This connector allows for wired network access and is only available on the Model B.
What can you do with it?
- surf in the Internet
- Text processing and spreadsheets
- movie / entertainment center ( openelec based for instance)
- electronics projects ( through GPIO hardware )
- much more ...
what makes it unique?
- Very strong community, built over the past 2+ years
- a lot of information and tutorials, and add-ons and software solutions are available online / can be bought
- based on GNU / Linux - access to many software packages for free, with easy installation
- low power consumption
- noiseless
- cheap
What is a Sensor?
There are numerous definitions as to what a sensor is but I would like to define a Sensor as an input device which provides an output (signal) with respect to a specific physical quantity (input).
The term “input device” in the definition of a Sensor means that it is part of a bigger system which provides input to the main control system (like a Processor or a Microcontroller).
Another unique definition of a Sensor is as follows: It is a device that converts signals from one energy domain to electrical domain. The definition of the Sensor can be understood if we take an example into consideration.
The simplest example of a sensor is an LDR or a Light Dependent Resistor. It is a device, whose resistance varies according to intensity of light it is subjected to. When the light falling on an LDR is more, its resistance becomes very less and when the light is less, well, the resistance of the LDR becomes very high.
We can connect this LDR in a voltage divider (along with other resistor) and check the voltage drop across the LDR. This voltage can be calibrated to the amount of light falling on the LDR. Hence, a Light Sensor.
Now that we have seen what a sensor is, we will proceed further with the classification of Sensors.
Classification of sensors
In the first classification of the sensors, they are divided in to Active and Passive.
Active Sensors are those which require an external excitation signal or a power signal.
Passive Sensors, on the other hand, do not require any external power signal and directly generates output response.
The other type of classification is based on the means of detection used in the sensor. Some of the means of detection are Electric, Biological, Chemical, Radioactive etc.
The next classification is based on conversion phenomenon i.e. the input and the output. Some of the common conversion phenomena are Photoelectric, Thermoelectric, Electrochemical, Electromagnetic, Thermooptic, etc.
The final classification of the sensors are Analog and Digital Sensors. Analog Sensors produce an analog output i.e. a continuous output signal with respect to the quantity being measured.
Digital Sensors, in contrast to Analog Sensors, work with discrete or digital data. The data in digital sensors, which is used for conversion and transmission, is digital in nature.
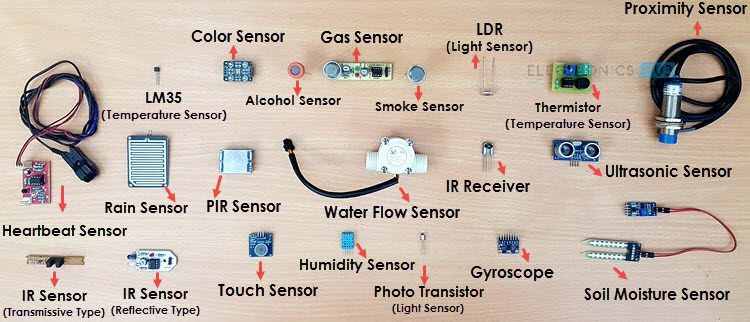
Different Type Of Sensors
The following is a list of different types of sensors that are commonly used in various applications. All these sensors are used for measuring one of the physical properties like Temperature, Resistance, Capacitance, Conduction, Heat Transfer etc.
- Temperature Sensor (It measures the changes in the temperature)
- Proximity Sensor (It detects the presence of an object. )
- Accelerometer (it measures Accleration)
- IR Sensor (Infrared Sensor) (Proximity and Object Detection.)
- Pressure Sensor (It measures Pressure)
- Light Sensor (To detect light)
- Ultrasonic Sensor (It measure distance as well as velocity of an object.)
- Smoke, Gas and Alcohol Sensor
- Touch Sensor (It Detect touch or near proximity)
- Color Sensor (It senses color)
- Humidity Sensor (Its measures humidity in air)
- Tilt Sensor
- Flow and Level Sensor (It measures water level and flow)
In this article, I tried to write the basics of Arduino, Raspberry Pi & Different Type of Sensors.
I Hope, It'll be of Some use to you all.
In Case of Correction Requirement!
Please Let me Know...
Please Let me Know...
THANK YOU!
Comments
Post a Comment